Sunday, December 12, 2010

Wintertime in the Backcountry Backyard

Only after it starts to get real cold do we see the Dark Eyed Junco around this neck of the prairies. There were several feeding together today.

A hungry Black-Capped Chickadee cracking open a sunflower seed. He has to hold it between both feet and hammer away with his beak, feeding is a lot of work!

Switch Grass bending under the relentless artic blast that moved in overnight early Saturday

This clinging bit of Big Sagebrush looks all alone. Last year's unforgiving winter snuffed out all of the other hardy shrubs but this.

What ever happened to that dreamy Indian Summer we were all enjoying this fall?

The old Ponderosa Pine doesn't even notice the artic cold, its just another day as far as this tree's concerned

Tuesday, December 7, 2010

Sandhill Cranes


Along with Canada Geese, various ducks and other waterfowl, these cranes can be seen at a protected refuge Near Ashland, Nebraska.


Thursday, December 2, 2010

Little White Heron


Hmmm.... not having much luck IDing just exactly what type of heron this little guy is. Seen in the Platte River valley near Ashland, Nebraska.

My Little Chickadee

Always in line, patiently waiting their turn after the sparrows have had their fill. Sure, they get run off by the jealous sparrows who don't much like sharing amongst themselves, but the Black Caps always come back to our feeder each breakfast and dinner for their meal.

Thank goodness they're so patient!

Sunday, November 28, 2010

Tipi Report - Pinned & Pegged

It's a been a hectic week and not too much time has been left over for working on my favorite project. Progress on my final pair of panels was also held up until some more materials where obtained. There's no 4" wide webbing to be found in town, so the lacing pin panels will have to do without that detail for reinforcment. Instead of the webbing I'll make the canvas panels four layers thick for strength. Any more layers than that and Grandma's sewing machine will go on strike! The thickness is also causing the fabric to pucker up instead of laying flat when pinned together. Still, the reinforcments throughout all the lodge cover's stress areas can't be considered an option.

With that done, I've just gotten started buttonhole stitching around the edges of each individual pin hole - four down, with approximately forty more to go :P


Soooo.... avoiding the 40 pinholes seemed like a pretty good idea, today I carved out the first few stake pegs and lacing pins, using straight chokecherry shoots collected from the backyard. Any hardwood that's straight and minus branches will do. The ins are about the thickness of a pencil, and the stakes between 3/4" to 1 " thick. Traditionally, a strip of bark is left, encircling ends of the pegs and pins, the rest is peeled and scraped away. The pins also got a light sanding after being scraped, so as not to catch and fray the tent fabric. A coating of beeswax or other weatherproofing agent on the pins might be a good idea too.

Saturday, November 27, 2010

Fattened Up for the Long Nap


Just by looking at our little toad, you know that he knows that its time for hibernating like all the others of his kind. As the days grow ever shorter he's become lethargic, sleeping almost days on end, burying himself in the leaves of his pen, coming out only occasionally to soak. We brought his pen indoors now, keeping him in a cool spot in the bedroom lit mainly by the daylight. There's some crickets along too, just in case he should get hungry, but mostly they're just around to sing to him as he sleeps.

Omaha Grass Dance "Crow" Dance Bustle

It all started with the Omaha peoples with their Grass Dance, adopted and passed along from tribe to tribe, growing and adapting until all across our entire nation native people celebrate with what we recognize as the modern Powwow.

Nothing beats the traditional old-time dance regalia, in my opinion. And I never pass up an opportunity to photograph a beautiful example like this one dispalyed at the Nebraska Historic Museum:


Even more compelling is that the two full horse tail drops are atypical from the usual painted hide or trade cloth ones with attached eagle feathers. I'd tried to emulate years ago this bustle. Every now again, I take it out and work on a detail... adapting-in any learned thing to be more authentic. It's been always a learning process and work in progress.

postscript
I've just discovered these front and back views of this dance bustle, along with some additional information at the UNL Digital Collections: Omaha Dance Bustle
Here's an example of a more typical old-style bustle: Typical Omaha Dance Bustle

Master of the Autumn Prairie

The buffs are already sporting a nice thick new winter coat of fur.

Thursday, November 25, 2010

Turkey Day!

Platte River valley, southeastern Nebraska


Wind Cave, South Dakota

Tuesday, November 23, 2010

Wild Bison in a Tame World

Ted Turner Shows Us It's Time To Let Wild Yellowstone Bison Out Of The Park

The governmental arguments that wild bison roaming out of Yellowstone must be destroyed because they may spread brucellosis to domestic cattle just got demonstratively thinner.

Saturday, November 20, 2010

Optional Links for Tipi Builders

Whenever one is making a tipi cover, tradition states that there should be happiness so as there will always be joy passed on to those who dwell within it in the future.

This hasn't been a problem for me since starting this project and realizing one of my lifelong dreams become a reality with the building of my own hand-made authentic tipi. Other than that I've dug out some of my old powwow cassettes for listening to while working on the cover, and found some additional inspirations online, such as the Black Lodge Singers rendition of Mighty Mouse!

ColoradoYurt.com also has a few fun links, such as a virtual tipi painter... check it out if you care.

Tipi Report - The Backbone is Done!


A week after all the finishing work on the backbone of the cover began, all the work of the layered reinforcing and web-edging is all stiched into place. The lift flap feels solid, and the additional webbed-edging definitely makes the smoke flaps stronger. This morning the smoke flap pole pockets were quickly stitched in place, and it's time to move on to those front lacing strips. After 3 months it's kind of hard to believe the cover is nearly complete. Now work on the two strips is all that's really left. As usual, I'm taking my time to check, double check and adapt each piece as needed to make everything work together as a whole.

Thursday, November 18, 2010

Indian Crafts and Lore by Ben Hunt

By now it's pretty obvious that I like collecting (among other things) old books I used to pour over and over as a youngin'. Here's another that's considered by some to be a classic.

Way back when, I'd got to the library and check out Ben Hunt's craft book, and try to reproduce what he illustrated so colorfully. This old paperback copy I bought with Junior in mind. Now he's eagerly soaking up the pages just like I did!


Wednesday, November 17, 2010

Cold Weather Camping


Junior's scout pack has a campout planned this month... which means we need to considerably upgrade for an entirely different level, instead of simple summer-time camping. Here's some basics:
  • Over pack, over prepare, and bundle in too many layers, because it's easier to decide to not use it than be miserable that we didn't have enough.
  • Cotton clothing is a no-no, go for polyester and wool fabrics as these will continue to help keep you warm despite your body's persperation.
  • Don't settle for a sleeping bag that isn't at least rated for 15 degrees for your average cold weather camping.
  • Dense foam pads will help keep you from soaking up the cold through the floor when you try to sleep. Air mattresses won't help and merely using mutiple blanket layers underneath (as we do for summer camping) will compress too much to insulate well.
  • Avoid cool drinks, drink coffee or hot cocoa instead


And here's some fairly imformative links:

Tuesday, November 16, 2010

Sunday, November 14, 2010

Tipi Report - The word of the day is REINFORCE

Tipi lodge lift flap/tongue and reinforcement patch.


Starch ironing the patches really aides the whole sewing process at this point as the layers and folds keep building.

After all the reinforcing patches are in place the cotton webbing hem tape will be added along the entire edge. I went with the cotton webbing as it would appear more authentic than nylon, matches the canvas coloring. And as this will be the top of the lodge, it won't break down from being exposed to the harsh prairie sunlight like nylon.

Tipi Report - The Backbone

Without a doubt the most daunting part of planning my tipi cover has been the lift pole/smoke flap assembly. This is were the real part of making a lodge is. The fact that my cover is made of lightweight canvas means I have to constantly think about reinforcing, reinforcing, reinforcing. The last thing I want to do is set up my lodge and have the first strong gust that catches the fabric to result in a catastrophy!

My tipi's lift flap will have 4 layers - 1 triangular piece on top the cover, with those sandwiched between two large half-circle patches above and below. The reinfored stitching over this area will be done in a criss-cross, or quilt-style pattern. Also, these patches extend over the adjoining corners of the smoke flaps which will be reinforced with a folded strip exteding up to the pole pockets. All along the edge, from pole pocket to lift flap to pole pocket will be adde a hem of 3" webbing tape.

I had to stop work for a few days until I could find a place that sold canvas sewing machine needles after the Sears Kenmore finally busted one after all this time. I learned that no matter how carefully I try, this machine will not zig-zag stitch through more than two-three layers of canvas fabric without catching the needle. Zig zags are stronger than straight stitches (ask sail-makers) but there's only so much that I can ask Grandma's old sewing machine to do.

I also had to run out and buy a third section of canvas now that I'll be extending the pin-hole flaps outward from the cover body due to adding gore panels to the bases of my smoke flaps. One little change can effect everything!

Blogworthiness

Some blogs I've had the pleasure to run across:


    The Color of Autumn Leaves

    After lastnight's snowfall the sun broke open a brand new, warmer day raining down upon our apple tree, and its leaves seem to be somehow a deeper shade of gold than before.

    Friday, November 12, 2010

    First Snow


    Tonight was the night that Junior's scout pack was supposed to have a weekend campout at Pawnee Lake (it was cancelled!). Up until now we've been spoiled with an exceptional Indian Summer, week after week of warm days throughout this Autumn... ummm, up until late tonight! No more than an inch accumulation is expected, but the icy claws of Winter will be sinking in deeper before too long, I'm sure.

    Sunday, November 7, 2010

    Tipi Report - Trail Fit

    The main body of the cover is all hemmed and double stitched. I couldn't resist trying it on! After the initial shrinkage of the canvas, the bottom hem is riding high, but the addition of the lift flap and the lacing flaps should lower the edge more than is shown. Plus I always have the option of adding more fabric if I think its needed ;) But obtaining enough poles of the proper length is going to be a bigger issue...


    Saturday, November 6, 2010

    Tipi: Home of the Nomadic Buffalo Hunters


    I've been doing plenty of research for the design of my lodge cover, since I want this to be both authentic and a durable costruction. I'm never happy blindly following a popularly-accept plan for anything. I want to know why something is such-and-such a way - should my lodge have narrow or large smoke flaps, gores or no gores, sewn stake loops or pebble wrap loops... the list of styles is varied if not endless.

    Anyway, talented illustrator Paul Goble shares his years of research in this highly graphic book, and he explains many "why's" quite clearly.

    Friday, October 29, 2010

    Too Close for Comfort?

    Can you see him? Out there lurking in the thick brush?


    Yep, that's him...

    And he's B-I-G!

    It may look like I scrambled up a tree to safety to keep some distance between myself and a hungry bear, but that wasn't the case ;)

    These Black Bears are kept a safe distance from watchers thanks to a high walkway at Wildlife Safari near Mahoney State Park. The animal life is allowed to roam, and the people keep their distance.

    Tuesday, October 26, 2010

    Tipi Report - Cutting Begins!

    Today we made the commitment of putting scissors to a very LARGE hunk of fabric - there's no turning back now!

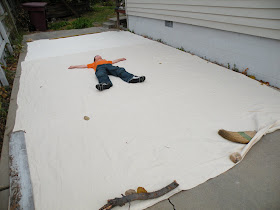
    BEFORE
    AFTER

    The 24' x 12' cover practically fills up my driveway, and makes use of two large canvas dropclothes joined end to end (which cuts down considerably on sewing!) Then after stretchinbg out my cnavas as flat as possible I simply determined the center line at the top edge, and from there measured out a length of string tied to a pencil to trace out the half circle shape of the bottom hem... the rest was snip-snip-snip.

    I'd already preshrunk my fabic to offset the risk of my lodge going from a size 12' to a size 10'5", so the very bottom edge came up a bit short. I can use some of the extra material just trimmed off to sew on there.

    Why a size 12' tipi? When many "experts" and manufacturers advise nothing less than 18'? Because 12' is right for the two of us - our plan is to eventually use this for camping (not "living"), it cuts down costs and construction (not to mention stress on an old sewing machine) and for now that's the plan I'll stick to.

    I can only hope that Grandma's 60's era Sears Kenmore is up to the task of sewing the rest. So far a canvas sewing needle and the spool of outdoor UV resistent polyester thread I found at Walmart is doing the job. Now I'll need to do some basic hemming around all the edges to keep the material from fraying and reinforce the existing seams with an additional zig-zag stitch.