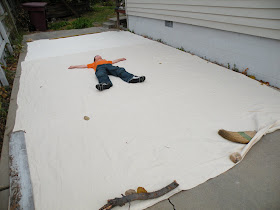
BEFORE

The 24' x 12' cover practically fills up my driveway, and makes use of two large canvas dropclothes joined end to end (which cuts down considerably on sewing!) Then after stretchinbg out my cnavas as flat as possible I simply determined the center line at the top edge, and from there measured out a length of string tied to a pencil to trace out the half circle shape of the bottom hem... the rest was snip-snip-snip.
I'd already preshrunk my fabic to offset the risk of my lodge going from a size 12' to a size 10'5", so the very bottom edge came up a bit short. I can use some of the extra material just trimmed off to sew on there.
Why a size 12' tipi? When many "experts" and manufacturers advise nothing less than 18'? Because 12' is right for the two of us - our plan is to eventually use this for camping (not "living"), it cuts down costs and construction (not to mention stress on an old sewing machine) and for now that's the plan I'll stick to.
I can only hope that Grandma's 60's era Sears Kenmore is up to the task of sewing the rest. So far a canvas sewing needle and the spool of outdoor UV resistent polyester thread I found at Walmart is doing the job. Now I'll need to do some basic hemming around all the edges to keep the material from fraying and reinforce the existing seams with an additional zig-zag stitch.

No comments:
Post a Comment